
The Amazing World Of Bike Geometry
Bike geometry is perhaps the most misunderstood, intimidating, and avoided topic amongst cyclists. Which is a shame! Without a basic understanding of the “hows and whys” of bike geometry, cyclists pick a bike like they’re buying fries at McDonald’s: small, medium, or large.
Sure, a simplistic approach will determine if you can straddle a bike. However, it leaves so many unanswered questions cyclists must consider. To put it another way, Tim Allen from Soigneur in London eloquently states: “Geometry creates a bike’s personality.”
To the untrained eye, bike frames look the same: two connected diamonds. But upon closer inspection, one will notice varying angles and dimensions. Especially when comparing a mountain bike to a time trial bike.
Bike geometry is a fantastic world in which a centimeter this way or that can transform a frame into a racing thoroughbred or a luxurious endurance machine.
Nerd Alert!
At this point, I’m sure some of you are thinking, “Who cares! That’s nerd stuff! I just wanna ride!” I’ll admit that bike geometry is a deep ocean of information. However, if you’re serious about cycling, then a quick course in Bike Geometry 101 will make you a savvy shopper and cyclist when determining a bike’s:
- Power transfer
- Responsiveness
- Steering/handling
- Cornering
- Climbing/descending abilities
KISS
No, I’m not referring to Gene Simmons and the boys, but the acronym, “Keep It Simple, Stupid!” In this case, I’m “stupid” and will do my best to explain with verbiage and photos what the different measurements are and how they translate into performance. Although I’ll touch on most geometry dimensions, I will not delve into all of them; it’s too deep of a well for that!
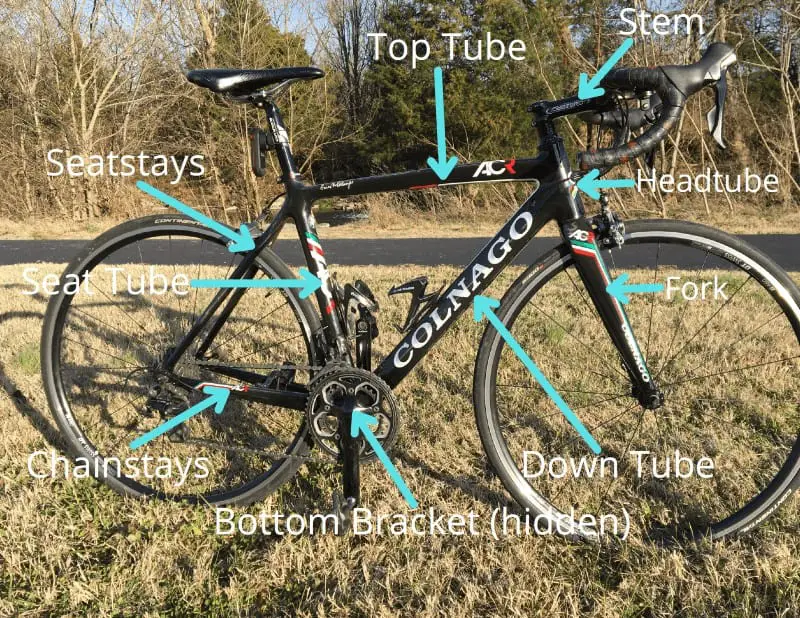
First, let’s begin by defining a bike’s anatomy. Along with the definitions, I’ve included an illustration to reference.
Seat Tube: As the name implies, and without insulting your intelligence, this is the tube that holds your seat post. It is angled back and runs up from the bottom bracket to connect with the top tube and seat stays.
Top tube: this is the bar you straddle and runs horizontally from the seat post to the headtube where your stem and handlebars are mounted.
Down Tube: This tube is roughly 45° and runs up from your bottom bracket (where your cranks are) to the headtube. Your manufacturer’s logo typically is on the sides of this tube.
Seat Stays: These two tubes straddle the rear wheel and connect the seat tube and the chainstay.
Chainstay: These two tubes run horizontally from the rear axle to the bottom bracket that houses your crankset.
Fork: These are the two tubes that straddle your front wheel and connect to your front axle.
Related article – Why Does My Bike Seat Keep Coming Loose?
How Do You Measure A Bike In Geometry?
The standard measurement for bikes is in centimeters (yep, even we Americans comply!) and is the distance from the center of the bottom bracket to the top of the seat tube (see picture for reference). Although this is a better means to determine your bike size than merely going with small, medium, or large, it still is not enough information to know if it fits you correctly.
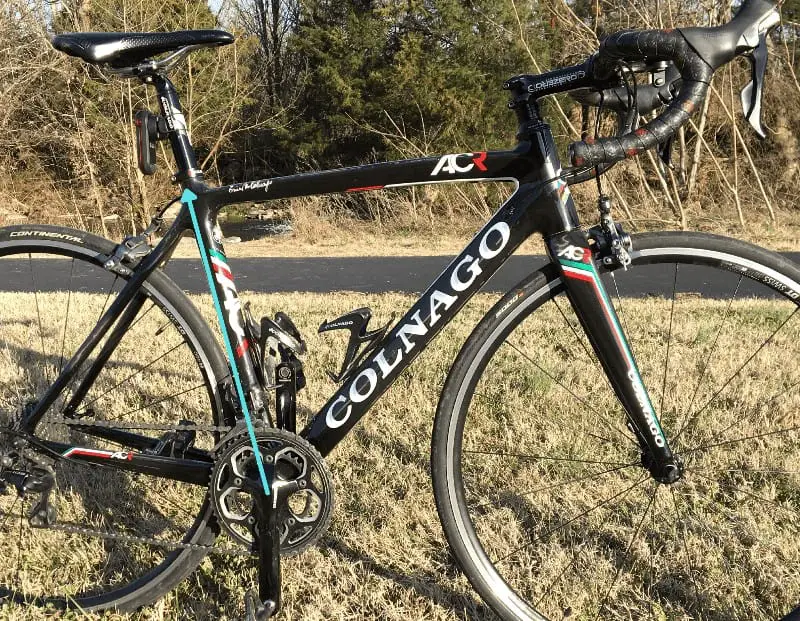
For example, I typically ride a 54 cm bike, but my Colnago’s seat tube (see the picture) is only 50 cm. Did I mess up? Did the salesman rip me off? No, and no.
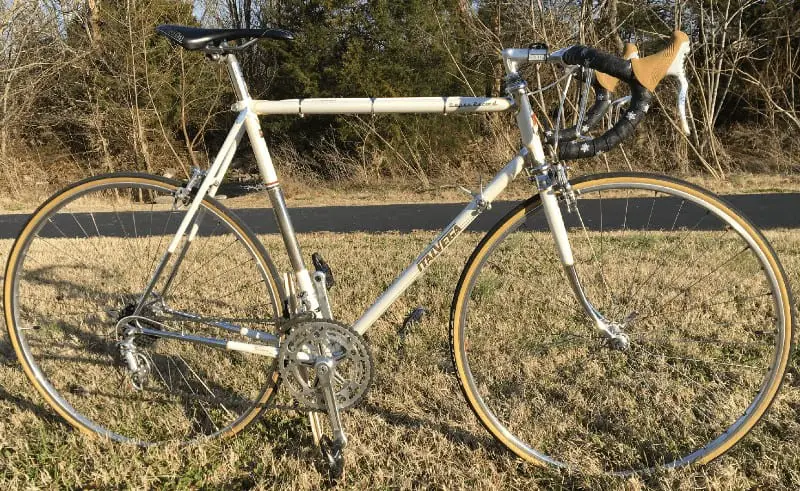
Notice that my top tube has a slight arc that drops below the horizontal line, while the white ItalVega (below) has a traditional, horizontal tube. The Colnago’s arced tube shortens the seat tube to 50cm while the other geometric aspects are that of a 54cm. The best way to measure my bike’s height is with what is called “stack.” Confused? Grab a beer, and let me explain all of this in more detail.
I was fitted by my local bike shop (LBS) before I ordered my bike. After making sure my form was right on my current bike, they used Colnago’s geometry sheet to determine which size would be best for me. I’ll discuss these in more detail, but they measured for:
- Stack and Reach
- Rider reach
- Seat position
- Seat height
- Pedal position
At this juncture, let me get on my soapbox to say that if you’re serious about getting a new bike, get fitted at your LBS before ordering. Manufacturers engineer bikes to fit and perform in a certain manner. Altering any aspect of this magical formula will impact the bike’s performance.
For example, shortening the stem may allow you to sit more upright but changes how the big steers, corners, and handles. The short video below offers other compelling reasons why a fit before buying is essential. Okay, I’ll hop off my box. Let’s move on.
How Does Bike Geometry Affect Your Ride? – Bike Geometry 101!
Two of the most important questions a new cyclist must ponder are:
- “What type of riding will I be doing?”
- “How does bike geometry affect handling?”
I often see new cyclists who prefer leisurely endurance events, riding an expensive racing bike. Inevitably, they ask me why this and that hurts and why they fatigue so quickly on long rides.
It’s a complex answer, but I surmise they “drank the Kool-Aid” that faster is better and ordered a racing bike. Instead, they should have shopped for a bike that fits them both physically and per discipline (i.e., endurance vs. racing.)
To better understand why a particular bike may not be your cup of tea, we need to know why “Geometry creates a bike’s personality.”
Some of the areas we will be examining are:
- Wheelbase and chainstay length
- Head tube angle
- Bottom bracket drop
- Seatstay drops
- Handlebars/stems
Like the human body, these work in harmony to function as one. In other words, and as I’ve mentioned prior, altering one affects the others and thus changes its “personality.” I’ll dive into this in more detail in the end, but for now, let’s go to school.
Wheelbase
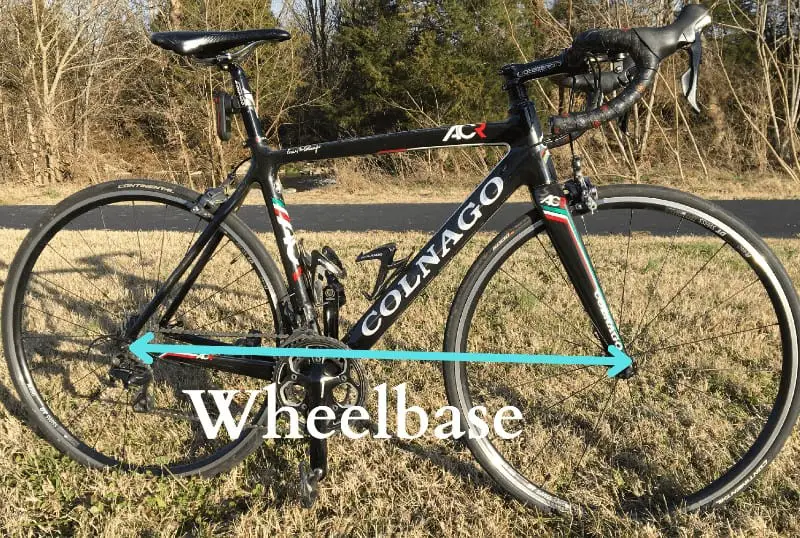
The wheelbase is the measurement from the rear axle to the front axle. (see above picture). Regarding how wheelbase affects the handling, think of it like comparing a minivan with a two-door coupe. The minivan’s extended chassis, which in our example represents a long wheelbase, provides a smooth, comfortable ride and corners gracefully but not aggressively. The coupe, our shorter wheelbase example, is fast, turns on a dime, is responsive but may not be comfortable on long trips. As you can probably surmise, touring and endurance bikes have a longer wheelbase than racing bikes.
It’s important to note how the chainstay length affects performance. When shortened, a bike is:
- Responsive – The bike feels more agile compared to a bike with a longer chainstay.
- Traction – Since the shorter chainstay puts the rear wheel closer to the rider and center of gravity, the bike will have better traction.
- Improved acceleration – A shorter chainstay is stiffer and transfers power (your watts) faster, resulting in quicker acceleration.
However, shortening could impact (perhaps negatively) the bike in the following ways:
- Tricky Handling – Although more agile, the bike may feel “squirrely” to some cyclists regarding handling. If properly fit, this shouldn’t be an issue. If your current bike seems challenging to handle, you may need to be fitted by your LBS, or consider a bike with longer chainstays or wheelbase.
- Front Wheel Lift – Because the center of gravity is toward the rear, the front wheel could lift when climbing. If you have experienced this, let your LBS help figure out what the problem is. A saddle adjustment may be the answer.
- Component Limitations – If you are thinking of changing the bike’s original components, the chainstay length will determine what, if anything, you can do. For instance, if you have caliper brakes but want to upgrade to disc brakes, you may not have enough chainstay clearance to do this.
Headtube
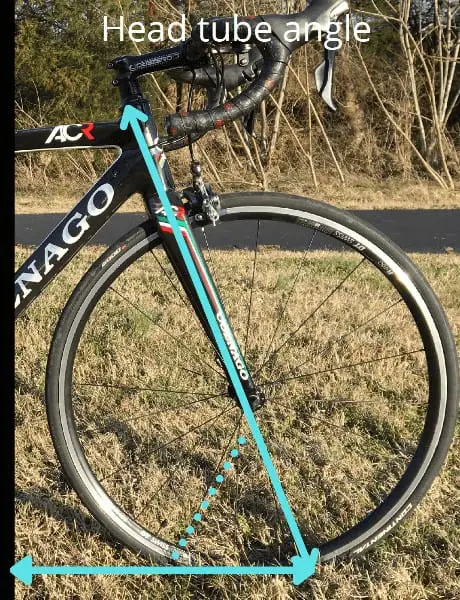
The angle of the head tube impacts how a bike performs, particularly when steering. The head tube angle is the angle obtained from the steering axis to the ground or the horizontal.
Generally speaking, head tubes are described as either slack (lower angles) or steep (higher angles.) Mountain bikes are an excellent example of a slack head tube at around 64°. This angle gives the rider better control when steering at high speeds through challenging terrain but takes more effort when steering at slower speeds. Conversely, a race bike with a steep head tube of 74° can knife through sharp corners at high speeds because steering needs less effort.
Bottom Bracket Drop And Height
Here’s how to determine a bike’s bottom bracket drop:
- Draw a horizontal line from the rear axle.
- Draw a vertical line up from the center of the bottom bracket.
- Where they converge (at a 90° angle) is the measurement.
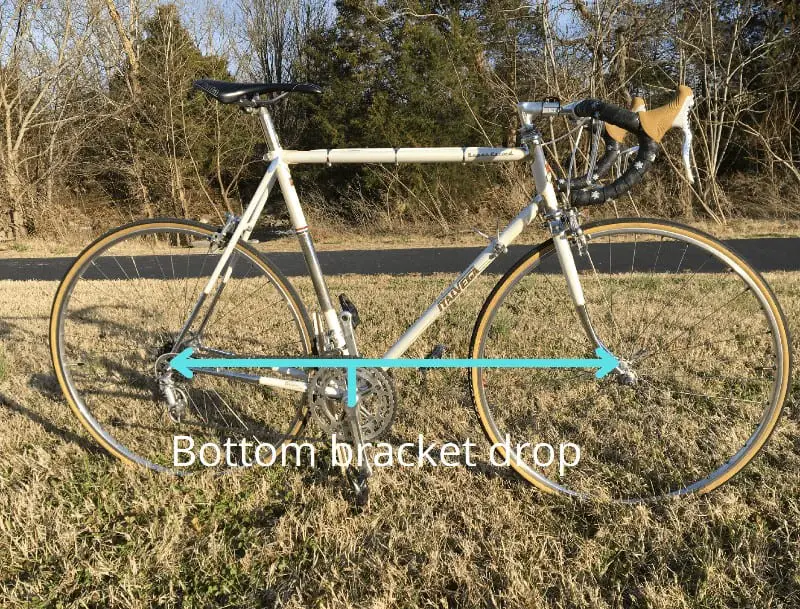
Bike builders feel that a dropped (lower) bottom bracket gives the cyclist a lower center of gravity. However, bike builder Dave Moulton disagrees, stating that, “…center of gravity is not really an issue on a bicycle, and raising or lowering it has little effect on stability.” He adds that a lower bottom bracket makes a bike more comfortable, while a higher bracket makes a bike stiffer for racing.
The other measurement to consider is the bottom bracket height. Simply:
- Draw a horizontal line where the tires touch the ground.
- Draw a 90° vertical line up from this line to the center of the bottom bracket.
- This length is the bike’s bottom bracket height.
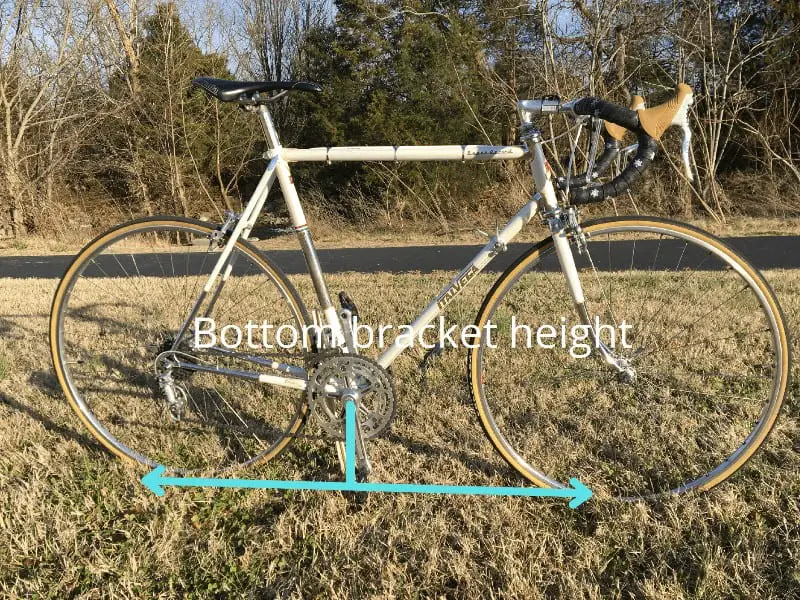
The bottom bracket height affects pedal clearance upon cornering. As you can guess, clipping the tarmac with a pedal is bad; very bad! Manufactures avoid this tragedy by installing crank arms that aren’t too long or short. If you plan to upgrade your cranks, make sure the length works with your bottom bracket height.
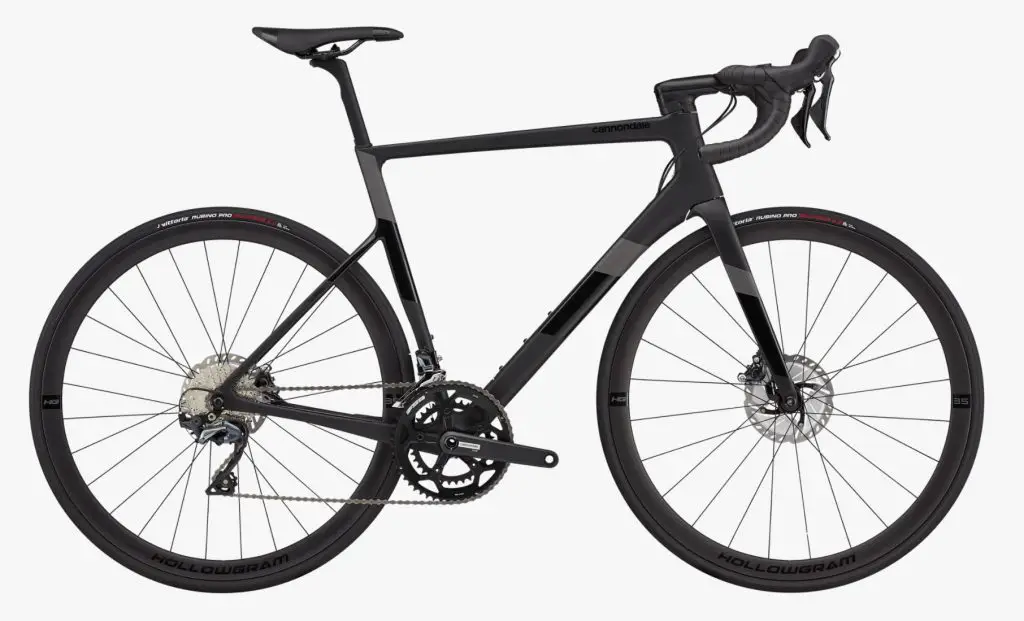
Seatstays
Seatstays are the culprits that deliver road shock because they transfer the shock from the rear wheel to the seat tube. Because of this, designers are always looking for ways to improve riding comfort without diminishing other desirables like responsiveness and stiffness.
Another term to understand is “dropped seat stays.” Notice in the picture how the seat stays are mounted (dropped) further down the seat post. The dropped position gives a rider a more comfortable ride, which is why if you’re in the market for an endurance bike, you’ll probably find it with dropped seat stays. Because dropped seat stays are more aerodynamic and stiffer, transferring power better, you’ll also find them on race bikes.
Stack And Reach – What Is Stack In Bike Geometry?
These two measurements are important when trying to determine if a particular bike will fit you or not. Remember how my 54cm Colnago has a 50cm seat tube and sounds too small? The reason it fits like a 54cm is because of the stack and reach.
Stack is the measurement at the intersection of a vertical line from the bottom bracket center with a horizontal line from the head tube’s top. The stack of my Colnago is 54cm. It should be noted that endurance bikes tend to have a greater stack than road bikes.
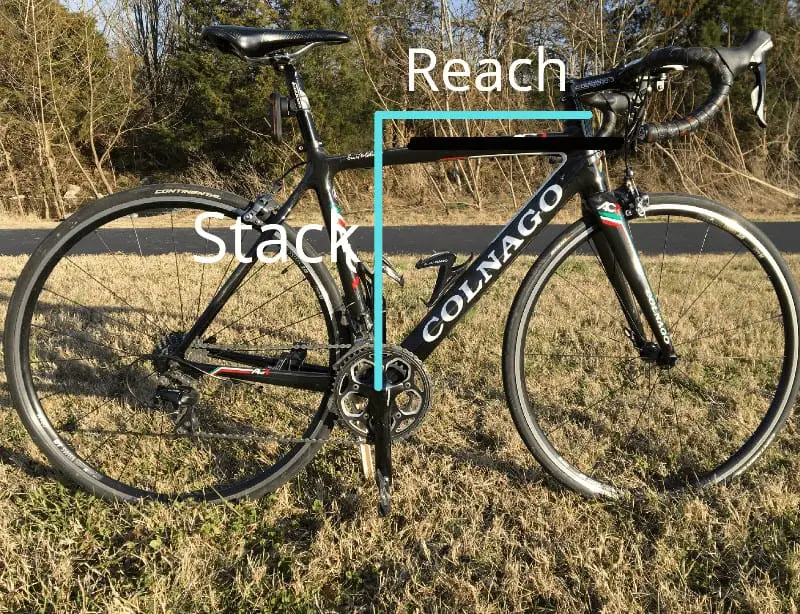
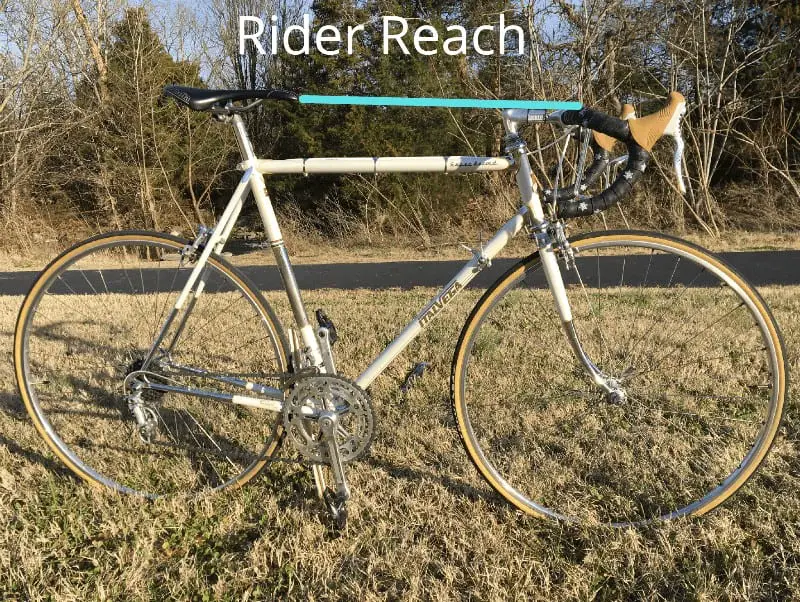
Rider Reach
Bike reach is often confused with the ability of the rider to reach the handlebars. That measurement is actually “rider reach.” Bike reach uses the same vertical and horizontal lines as stack but measures the distance horizontally to the headtube’s top.
Reach gives you an idea of how long the frame is; frames with more reach (longer) are usually race frames designed to stretch the rider out into a more aerodynamic position. Endurance bikes that opt for comfort over aerodynamics will have a shorter reach allowing the rider to sit in a more upright position.
Since I brought up rider reach, I need to clarify what this means. Rider reach is the measurement from the tip of the saddle to the end of the stem. Rider reach can be adjusted by sliding the saddle forward or backward.
Related article – Is A Road Bike Good For Your Back?
Oh, And One More Thing…
Unfortunately, I ran out of time and space to discuss other geometry aspects like:
- Trail
- Rake/Offset
- Handlebar width
- Stem length
But before you toast me with a pint for finishing and bolt out the door, I want to chat about how little alterations with either of these can affect handling and steering. To do this, I’m going to draw upon personal experience.
Recently, I replaced the original handlebar (38cm) on my 1973 ItalVega with one that was 45cm wide. As much as I wanted to keep the bike original, the narrow bar restricted my arms from pulling when climbing out of the saddle. The new bars changed this for the better, but I noticed the steering is different. The narrower bars meant that the turning arc was smaller, so steering was more responsive; it had that “turn on a dime” feel.
The broader bars have a larger turning arc, which meant it couldn’t turn sharply and took more effort to steer. This change isn’t necessarily bad; just different. I need to note that the bike still corners on fast descents like a champ. I’ll forgo the “turn on a dime” for how the cockpit feels more like my Colnago (thus familiar and comfortable) and helps me climb better.
To maintain the vintage look, I kept the water bottle mounted front and center on the handlebar. Lately, I noticed how the steering and handling felt off as if the fork couldn’t turn smoothly or a brake cable hindered movement. Every time I stopped to inspect, I ruled them out as culprits. It wasn’t until yesterday while feeling the same sensation, that I eyed my water bottle.
Could this be the reason? Close to home, I emptied it, and the “stuck” feeling was gone. The water’s weight over the tire and my wide bars that extended my weight closer to the front wheel contributed to this effect. The point of all of this is that I need to heed my advice: altering one aspect will often have a domino effect. I now need to either accept this new ride sensation or look into other water cage options.
For a more in-depth read on this and other aspects of how geometry affects a bike, check out this article.
You Graduated!
If you made it this far without too much cussing, drinking, or aggravation, then congrats! You’re a graduate of Bike Geometry 101! I hope you have a better understanding of how geometry affects a bike and gives it ‘personality.” If nothing else, I’ve given you an excuse to give your significant other why you need another bike!
For you overachievers who want more, more, more, then check out this video.
Thanks for reading and if you have any questions or comments, please drop us a comment below!