
Fancy tackling Alpe Du Zwift for the first time? Nice one! There’s a lot to think about before taking on this beast so it’s best to think about how to ride Alpe Du Zwift before you try it!
Preparation and pacing are going to be key to your success and I’m going to explain exactly what that looks like below!
What Is Alpe Du Zwift?
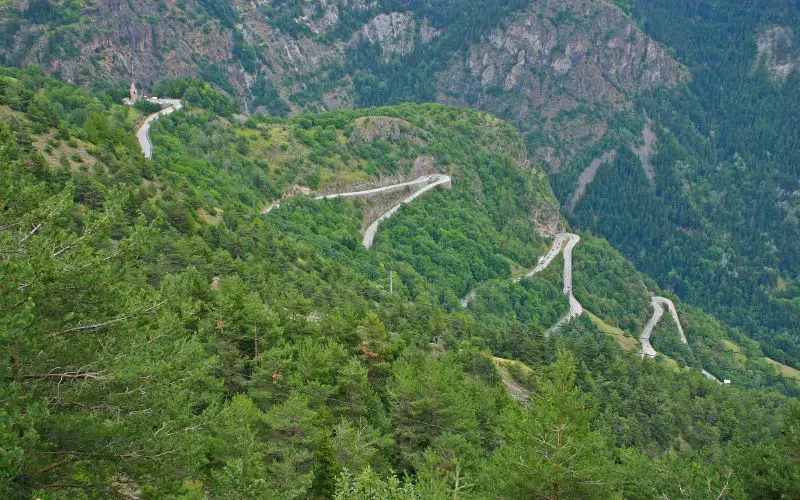
Alpe du Zwift sounds similar to that well-known climb in the French Alps, Alpe d’Huez, right?
That’s because it’s virtually twinned with it! Alpe du Zwift follows the 21 hair-pinned climb exactly. Following the same gradients and distance of the Tour de France favorite.
The best bit is, you don’t have to travel to France to climb it!
If you are yet to climb Alpe Du Zwift then you should know that you have to be rider level 6 on Zwift to be able to unlock the route. The route itself is called Road to Sky – pretty apt, don’t you think? 😆
So if you aren’t at level 6 yet, you’ll have to put some more miles to level up before you can take on the beast. However, that’s not bad if you’re new to Zwift and/or indoor cycling. I’d recommend doing some different climbs to prepare yourself anyway.
My advice? Start with The Volcano KOM. It’s a 3.7km climb with an average gradient of 3% so it’s a great introduction to Zwift climbing.
After that, move on to Epic KOM before heading to the Alps.
How Hard Is Alpe Du Zwift?
As Alpe Du Zwift is an exact replica of Alpe d’Huez, it’s also 12.24km (or 7.6miles if you prefer) so a lengthy climb.
In terms of elevation, it’s a gain of over 1000 meters (3400ft).
That makes it an average gradient of 8.5%. To make it even worse, it’s not very constant. Expect to see the gradient rise to 13-14% at times. It’s grueling for most of the first time you ride it.
The shortest route on Zwift to include Alpe Du Zwift is the Road to Sky, and that’s 17km.
You’re going to need to allow yourself over an hour to complete this ride, even with a strong pace.
Let’s say you ride all the way at 3 w/kg. You’ll get to the summit at around the hour mark. Again, if you’re new to cycling, I’d aim for around the 1-hour 30-minute mark. It’s a steady pace and unlikely to make you puke!
Related article – How To Get The Zwift Tron Bike – Tips And Tricks
Tackling The Course For The First Time
When you’re ready to ascend Alpe Du Zwift for the first time, you’ll head down into the Jungle and be getting ready for the first 10% kick up.
My biggest tip here is don’t go too hard in the first 6km. It’s tempting but don’t. Pace yourself.
I’d also recommend that you do your best to ride at a constant tempo. Changing your speed becomes tiring for your body and you will wear out more quickly. Unless the Pros are trying for a breakaway, you’ll see they stay fairly steady, there’s a reason for that!
Your w/kg is the figure to watch when climbing. I mean, don’t get too fixated on it but it’s a good measure.
As you approach your first hairpin, check out your pace and ensure it’s in line with where you want it. What I like about Alpe Du Zwift is that pacing is easy because all the information is on the screen for you to absorb.
Zwift also counts down each hairpin. It’s good, but I’ve found it a bit tough at times as the hairpins get further apart as you get closer to the top.
Expect the final 3km to be the hardest and feel like it’s neverending – you’ll need to really dig in here! Your power reading is what to focus on here, as your average speed will vary as the gradients change.
Related article – Zwift Setup Ideas For Any Budget
Prepping For Alpe Du Zwift
When you’re ready to tackle Alpe Du Zwift, you should start with a warm-up so you don’t shock your legs when you start the climb.
I usually do 20 minutes of easy spins, paired with a few tough efforts to get my legs ready.
Also, set yourself up with a good fan or three(!). You probably already know you need a fan when you’re cycling indoors but just a heads up otherwise.
Another thing to consider is how you want your trainer settings to be. If you want to make the climbing easier, then adjusting your ‘Trainer difficulty’ is the way to do it. You can find this under Menu > Settings.
The default on Zwift is at 50%. So in theory, it’s half as difficult as real life. 100% is life for like with the real Alp d’Huez. Personally, I wouldn’t recommend starting there but hey, you do you! 😜
Dial down the difficulty percentage on your trainer a bit; honestly, it’ll make a big difference. There’s nothing stopping you from increasing it over time!
You may also like to read How To Connect Zwift To Garmin.
Hitting The Summit
Apart from the sheer relief of reaching the climb’s top, you get some nice Zwift surprises.
A spinner is activated at the top of the summit and will land on a “free gift”. Sometimes this can be some extra XP, or even a new wheelset – these will be the best climbing wheels available on Zwift so next time it’ll be even easier to reach the summit!
Frequently Asked Questions
How Do I Get Faster?
Firstly, if you could benefit from losing a few pounds, then this will help make you a faster rider. Overall, getting fitter and stronger will make you faster.
You must also consider the bike you use when you’re on Zwift (I mean your virtual one!). Depending on the scenario, different bikes perform better, much like in real life.
The best bikes for climbing are Cannondale Evo or Specialized Tarmac Pro. Unfortunately, these are only available for riders level 33 or higher.
Your best bet of improving your time on Alpe Du Zwift will come down to pacing. Use your watts to pace yourself and you want your breathing to be hard but controlled.
When you get to the final 3rd of the climbing, you should aim to raise your pace. Over time your overall pace will increase.
Related article – Can Indoor Cycling Help Improve My Running?